Archive | February, 2013

Growing Mushrooms at Fayrehale Farm — Have *You* Grown Mushrooms?

Mushroom-Logs

We are ready to add growing mushrooms to our food production exploits here at Fayrehale Farm , the home of Fayrehale Chantecler Chickens.

We have done some reading and feel the decision is with plug seeded logs outside under some conifers and/or button mushrooms in the cellar.  Our 1840 Vermont Village home has a nice, dark, dirt floored, stone walled cellar.

I look at this page as not only a way to share our knowledge and experiences with you but as a way to gain from your knowledge and experience as well!

I look forward to hearing from those of you who have successfully grown your own mushrooms!   Thanks:)

Mushrooms-Button

5

Raised Garden Beds – Their evolution……

In late 2010 after I left Borders and moved to our home in Vermont full time, we decided to create raised beds.  We had an open and sunny space in the side yard.  I figured with my back, life would be easier if I did not have to bend and reach to the ground.  My back has been helped and I have been kept moving and living life with Bowen Therapy provided for nearly a decade now by my Bowen Therapist William Kelley

raised beds 1

Ironically it was less expensive to buy the 2″ planks at a big box lumber yard that from the local sawyer we checked with for green hemlock!  Much less expensive!  DO NOT use any pressure treated products!  We went looking for 12″ wide and settled for 10″ wide as that was what was available and we needed to get the project underway.

We constructed the “boxes” in the driveway. 4’x12’x 10″.  Nailed first and then screwed. Then we carried them out and positioned them.  This shows 7 of the 4’x12’s (the 8th is off to the right)  and  two 4’x4′. The aisles are 4′ wide.  Notice the Apple Arbor in the background.

RaisedBed2

Landscape fabric was laid in the aisles and tucked under the edge of the boxes.  You my want to skip this step.  We wanted the bottoms of the boxes uncovered so grass and roots would compost and worms could migrate up.

RaisedBed 3

We had top soil delivered and dumped in the driveway.  Tom, bless his heart, used a wheel barrow to fill the boxes.  I picked up composted cow manure from a local source and added that on top of the top soil  Boxes were covered with black plastic for the winter so they could “cook” and “work”.  Took the plastic off in the spring and found that a large rat snake had decided that curling up in the corner under the plastic was a nice way to warm itself:)

RaisedBed4

After we removed the black plastic winter covers we had a fresh snow. Poor Man’s Fertilizer ! Late snows are so called as they deliver nitrogen to the soil.

RaisedBed5

Snow has melted, rat snake has found a new home, apple arbor is budded, aisles have been covered with bark mulch and the beds have been turned by hand with a spade fork.

RaisedBed6

Planted and looking good.  It is amazing the difference the 10″ elevation makes!  Easy to bend, reach and work both sides.  We figure as I “mature” we can add 10″ levels and make 20″ tall and then when I am 90! 30″ tall.  When the sides decompose (7, 10?? year we will box around the outside with fresh planks and then the interior original frame continue to compost.

RaisedBed7

THEN!  we had the idea to make three “sets” into greenhouse hoop houses! We used PVC pipe and the same system on the side of the raised beds that we used when we constructed our much smaller Poultry Breeding Pens

Two 4’x12′ raised beds with a 4′ aisle means the hoops are 12’x12′

RaisedBed8

In the picture above you can see how we did the top of the arch. The Hoops are 18″ apart. Two 10′ pieces of 1″ PVC join at the PVC “T” connector. Pieces of PVC join the hoops and maintain the spacing along the top.

RaisedBed10

This shows how we framed the doors…  The uprights are connected to the outside hoops w/ electrical conduit clamps like were used at the bottom. Angled supports on either side and one back support on the side where the door hinges are.  We found screen doors on sale for $19  and picked up one for each of the three hoop houses. We could not build doors for that when you consider time and materials.  Doors were covered with 1″ chicken wire.  The back was framed similarly without the internal door support.

Raisedbed11

Because we planned to winter chickens in two of them we put 4′ tall  1″ chicken wire around the inside of the hoops and attached w/ plastic zip ties.

RaisedBed12

Composed cow manure placed over the beds.

RaisedBed13

A very generous layer of leaves on top of the cow manure.  Leaves are good for the garden as they are full of minerals and elements from deeper in the earth.  You can see here that we placed nest boxes in the back.

RaisedBed15

Greenhouse plastic applied.  Corners had not been finished when picture taken

RaisedBed16

The third hoop has two smaller hoops over the raised beds. Greenhouse plastic was then applied like the other two.  This is the hoop where we plan to master Four Season Gardening. We aren’t there yet but we will get there.  Spinach, kale, mustard and other hardy greens for fresh winter harvest.

RaisedBed17

Winter arrives,  The front hoop is where we are working to master winter greens. The back two house chickens seasonally.  We had one upright support in the center to start.  Then added two more so there there are three supports for winter to deal with wet snow loads with out me having to get up during a storm and clear the snow off!  Two come out in the spring. Only the center support stays and it is connected to the hoop w/ an electrical conduit clamp before the plastic cover was applied.

Chantecler Hoop

Our Chanteclers are using this hoop for the winter. You can see the three center supports. Middle one is permanent and the two on the ends are seasonal. All joined and stabilized by a 2×4 to serve as a roost in the two houses with chickens.

There you have it. They work well for us. You can modify, if you feel it necessary, and make work for you.

13

What is *Your* Favorite Winter Squash ?

squash1

We grow the traditional winter squashes —  acorn, butternut and buttercup, all of which we get from High Mowing Organic Seeds

This year we will add:

Squash2GaleuxD_EysinesSquash

Galeux D’ Eysines

A beautiful heirloom squash. This flattened, round 10-15 lb fruit has a gorgeous salmon-peach colored skin that is covered with large warts! The sweet orange flesh is used in France for soups and also can be baked. A nice French heirloom.

Squash3Turks Cap or Turban

A beautiful squash striped in red, orange, green and white. A very old variety from France (pre-1820). Fine thick orange flesh; good sized fruit. Unique.

squash4jpgLong Island Cheese

A longtime favorite on Long Island very popular for pies. Flat, lightly ribbed fruit look like a wheel of cheese with buff colored skin. A very good keeper of excellent quality; 6-10 lbs. each; a beautiful heirloom variety.

squash5

Blue Hubbard

Huge, teardrop-shaped fruit weigh 15-40 lbs and have sweet, fine-grained, golden flesh. Great for baking, pies, and soup. The hard, blue-gray shell helps these keep for long periods in storage. Gregory Seed Company introduced this fine New England variety in 1909, and Mr. Gregory considered this his best introduction.

These four less traditional winter squashes will be in our 2013 garden and the seeds came from Baker Creek Heirloom Seeds

SO!  What is *Your* Favorite Winter Squash?  Let us all know what you grow and how well it stores.  Our goal here is to reach the point where we grow all the squash we will need for a year…… and we like and use a lot of squash!

1

Poultry Breeding Pens

BF3

We have just experienced the Blizzard of 2013.  We are shoveled out and all the birds are fine.  I can’t stop thinking about the approaching breeding season!  I am resisting and controlling all urges to start the incubator!  That has to wait until March when we do the fertility check prior to shipping hatching eggs and prior to hatching the chicks we will ship.Those lucky chicks from the fertility check will live a good live and die a fast and humane death so they can feed us next year.

In the mean time, there has been interest in our small breeding hoop pens.  They are easy and cost effective to make, great to use for breeding pairs or groups and moveable. They can work for poultry other than chickens  and modified to any size you need.

BF1

This picture gives you a good view of the frame work. We made a 4’x6′ box with 2″x10″ boards.  As you can see a piece of strapping is added to the 6′ sides. Electrical conduit clamps are added above the strapping (which serves as a stop) to receive and hold the 3/4″x10′ PVC pipe that we used for the hoops.

BF2

We made six units and moved them into place behind the Apple Arbor and in back of the tent where we sleep three seasons of the year.  We placed a piece of strapping along the top of the hoops and used plastic ties to hold the hoops evenly  spaced. The we put 1″ chicken wire over  sides and back.  Again plastic ties held the wire to the hoops. If using 3′ wire it will take 3 pieces (6′ wire will take 2 pieces and join with an overlap at the top).  Start with the first piece on top. This way your side pieces, which will overlap UP over top piece (predator can’t nose in) and go down below the strapping used as a hoop stop.  NOTE: Depending on your situation you may want to use hardware cloth around the bottom instead of or over the 1′ chicken wire.

BF4

Rain Cover: Once wired, we used an inexpensive blue tarp to cover the back half of the pen. It wraps around the back but does not totally close the back so there is air flow in the summer.  These pens back up against mature conifers so the opening in the tarp cover in the back is shaded.

Perch: As you can see, we nailed a 2×4 upright to each side and placed a 2×4 across for the perch.

Door: You may not like what we did for the door and you can be as fancy as you like when placing door on open end.  We took a 4’x4′ piece of 1/2″ plywood ( 2 pens to a sheet) secured the bottom in a groove made by nailing a piece of strapping to the top of the 2″x10″ front base. Be sure to leave a little more than a 1/2″ space.  The bottom of the plywood front sits in the groove (can’t be pushed out) and then we added screw eyes (bolt style) near the top of each side so we could use bungee cords to secure  to a hoop.  The picture above shows this and as I said be as fancy as you wish if you don’t like our system! It works well for us.

Cost: There is no point in my discussing costs. We are entering our third season with these pens.  You can easily make a materials list and price the materials in your area. I know they are the most reasonable and versatile system we could come up with.

As an aside: We have kept yearling peacocks successfully in one through the winter by using  greenhouse plastic to cover all but the front (closing off the back).  We then places two old quilts over the top (not all the way down the sides) and let what ever snow falls add to the insulation.  This has worked in Vermont with spells of subzero weather.

Good luck with your 2013 season. We are looking forward to ours!

ADDENDUM

I have received numerous requests, on here and through other electronic media, to provide pictures of the door system we are using on our breeding pens. I will add three pictures and hope they provide the necessary information.

door1

Not the best day for taking pictures as everything is wet!  Look carefully and you can see the scrap of strapping we used..  10-12″ ….there is a matching piece on the other side (3rd picture). One could put it all the way across but we saw no reason to. Slight warp shows some corn. This pen is wintering 2 young peacocks.

Door2

Neighboring pen that we are not using this winter. Plywood has been set aside. I took the snow off the scrap of strapping  and left the snow on the front baseboard.

Door3

If you look closely (sorry wet day so all wood is dark)at the top of the picture, you can see the end of the far side “stop” .

We also had inquiries about opening the pen.

To feed and water, I open the right side either by sliding or by lifting up and over the “stop”.  This allows me to feed and water alone.  If they won’t lay eggs up front I use a small net to retrieve them.

Major work, like moving birds etc., requires the help of a second person to “man the door”.

DSCN1024[2]

April 20-21, 2013 we added this hoop pen

This past weekend we changed plans and rather then build another wooden coop, we hooped the floor platform creating a 4×12 pen that has been designed so we can slide a divider between the pair of closely spaced center hoops.  Divided we would have another pair or 4×6 breeding pens.  WE PREFER frames on the ground as the ones first discussed above have.  We already have the platform  and so we used it.

18

Thinking About Tomatoes!

heirloom_tomato

Tomatoes rank at the very top of the list of what I enjoy most from the garden!  I can eat them like apples but la piece de resistance is tomato sandwiches so thick and juicy that I have to eat them over the kitchen sink or outdoors!  I could live on tomato sandwiches morning, noon and night for the entire tomato season!

Thus, I am thinking about tomatoes.  I spent last night perusing the Tomato Growers catalog AFTER checking out their GMO statement!  Inside cover: ” While we never sold very many treated seeds, we now only sell untreated seeds. In addition, all of our seeds are not genetically modified”

So here are the tomatoes I have marked to try!  One can never plant too many tomatoes!

Tomato Gregoris Altai

Gregori’s Altai

A Siberian variety that originated in the Altai Mountains on the Chinese border. Tall plants are heavy producers of 8 to 12 oz. pink-red beefsteak tomatoes. The flavor is sweet yet acid and just delicious, with harvests continuing over an incredibly long season. Indeterminate. 67 days.

Tomato Stupice

Stupice

From Czechoslovakia, this is an extremely early cold-tolerant tomato that bears an abundance of 2 ounce flavorful and sweet tomatoes. This variety has become a garden favorite for its earliness, productivity, and truly wonderful taste. Indeterminate. 52 days.

Tomato Costoluto Genovese

Constoluto Genovese

Italian heirloom tomatoes. Large, deep-red, juicy tomatoes are deeply ribbed but fully flavored and absolutely delicious. This variety is hearty and does well in hot weather, but continues to produce even when the weather turns cool. Indeterminate. 78 days.

Tomato Russian Rose

Russian Rose

This Russian heirloom variety is aptly named as it bears fruit as pretty as a rose. The tomatoes are large rose-pink globes with excellent, sweet, full tomato flavor. The average size is usually about 12 ozs. with meaty flesh. Expect a good sized crop of these top-quality tomatoes. Indeterminate. 78 days.

Tomato Amish Paste

Amish Paste

Amish heirloom variety produces paste-type fruit with an oblong oxheart shape. 8 ounce tomatoes are solid with an outstandingly good, sweet flavor. Indeterminate. 85 days.

Tomato Anna Russian

Anna Russian

Heirloom seed handed down to an Oregon woman from several generations of her family, along with the story that it came from a Russian immigrant. Large, juicy pinkish-red heart-shaped tomatoes consistently weigh 1 lb. or just under. Flavor is superb. Small foliage and wispy vines are typical of oxheart-type tomatoes, but this one is distinctive for its size, earliness, and juicy outstanding taste. Indeterminate. 70 days.
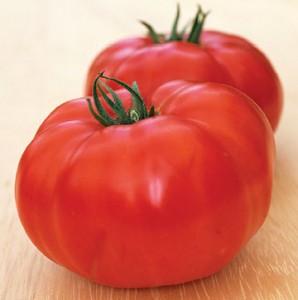
Tomato Chapman

Chapman

Beautiful, deep red fruit is quite large, weighing from 1 to 2 lbs. with dense, meaty flesh and extraordinary flavor. Instead of being a shy bearer like some large beefsteaks, the plants of Chapman are prolific, yielding plenty of these huge tomatoes. This wonderful heirloom variety will soon become a favorite among tomato gardeners. Indeterminate. 80 days.

Tomato Grandma Marys Paste

Grandma Mary’s Paste

This familiar heirloom variety has large, pointed red paste tomatoes that are meaty and flavorful, just right for cooking into sauce or chopping up for fresh use. Expect abundant harvests, as these plants are prolific. Indeterminate. 70 days.
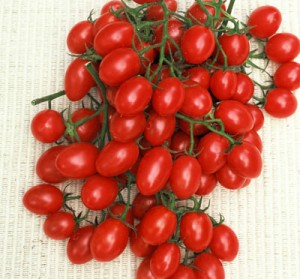
Tomato Rosalita

Rosalita

This is the only pink grape tomato we know of that is really the size and shape of a red grape tomato. Long clusters of small, oval fruit are deep rosy pink and abundantly produced on tall, vigorous plants. These tomatoes are as sweet as rosé wine, and a delightful new choice for anyone who likes grape tomatoes. Indeterminate. 60 days.
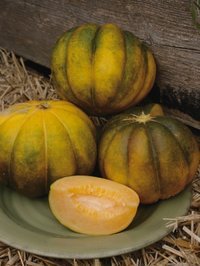
TomatoBigZebra

Big Zebra

A tomato that is red and green-striped is so unusual that it’s safe to say that you’ve probably never seen anything like it before. Although deep red and green outside, its interior is green with pink extending up into the middle. The appearance is striking and different. Fruit is medium to large with a mild, sweet flavor. Indeterminate. 85 days.

Tomato Copia

Copia

These very beautiful tomatoes are a stunning combination of fine-lined golden yellow and red stripes. While visually exciting, the real treat comes when you cut them open. Their gold flesh is streaked with red and is very juicy, flavorful, and sweet. A stabilized cross between Green Zebra and Marvel Stripe, these tomatoes weigh about one pound each, They were named in honor of Copia, the American Center for Food, Wine and the Arts, in Napa California. Indeterminate. 85 days.
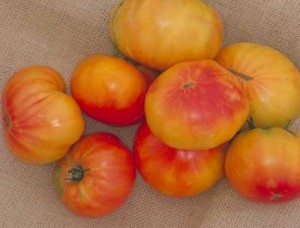
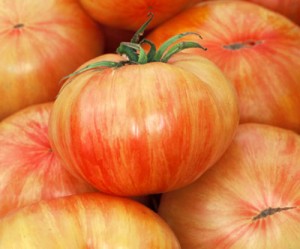
Tomato Marvel Stripe

Marvel Stripe

This heirloom variety has become one of gardeners’ favorite bicolored tomatoes because of its beauty, size, and taste. Large yellow-orange fruits are streaked with ruby red and have a sweet, fruity taste that is absolutely delicious. Tomatoes weigh about 1 lb., although they often become 2 lbs. or even more. Large harvests on vigorous vines. Indeterminate. 85 days.

Tomato Cherokee Chocolate

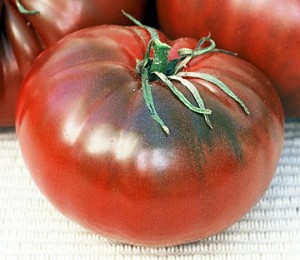
A free package of Cherokee Chocolate comes with the order

A stabilized version of Cherokee Purple, this 10 to 16 oz. mahogany-colored variety has excellent flavor and beautiful large fruit. Very productive plants are vigorous and yield a large harvest of these chocolate-colored tomatoes with the ample size and wonderful flavor associated with Cherokee Purple. Indeterminate. 75 days

This should get me in enough tomato trouble for 2013.  Some interesting varieties that will be new to our garden.

I encourage, NO I BEG, you all to order seeds from a safe source!

If you do not start your own seeds, please find a small local source that does! Please stay away from big box stores!  They are responsible for bringing in the blight that has hounded us here in New England.

Are you thinking about Tomatoes?

3/13/13

Started the first of the tomatoes today, 3/13/13.  It will take them 7-10 days to germinate and then they can spend 3-4 weeks here in the house in a southern window before they move out to a hoop house.

DSCN0768[2]

Decided to use peat pellets this year for the tomatoes.  Easier to plant and water and means the next “transplant” is just moving to a larger pot w/o disturbing the root system. When they are potted up I will bury some of the stem.

DSCN0770[1]

Peat pellets have swollen to full size and “swallowed” the seeds. Interesting the different seed sizes and colors between varieties.

DSCN0771[1]

Two trays planted today. Potential of ten plants each of ten varieties.  We are trying new varieties this year as mentioned and described above.  They will live here in this chair where it is warm (wood stove heat) until they germinate.

DSCN0773[1]

Once the tomatoes have germinated they will be moved to this unit in a South window at the top of the front stairs.  The unit will hold 8 trays of seedlings.  There is another window at the bottom of the stairs and a unit to go there as well.  The only two Southern windows in the house!  Hopefully, someday, a greenhouse of the South side of the attached barn.  Until then we use what we have:)

4

The Apple Arbor at Fayrehale

cropped-apples-4.jpg

Based on an example we saw in Colonial Williamsburg, we planted an apple arbor here at Fayrehale.  The greatest feature is the close planting of trees. Remember we are working on .6 acres (notice the point) on the edge of a picturesque Vermont village!  Or arbor consists of 32 semi-dwarf apple trees (2 each of 16 varieties). We did the high number of varieties because apple trees produce in cycles having off and on years with regards to production.  We figure this system will always give enough apples for two people!

DSC00006

Starting in 2005 we staked out the design. We wanted the apple arbor to be both a fruit producer and an architectural garden feature creating a pleasant transition from one garden room to another. We purchased the trees from E.C.Browns’ Nursery here in Vermont and had them do the planting. (Wedding Present  from Tom’s Mother) The main run is shown above. Stakes (and thus trees) are 3′ apart and space between rows is 8′ wide. There are three side “entrances”.  One on the left (goes to the raised bed vegetable garden) and two on the right (one goes to a small sitting area and the other to the small hoop poultry breeding pens.

DSC00010

Trees planted. This image  shows one of the two back “entrances” . Looking at the upper left you can see the “entrance” to and from the raised bed vegetable garden which has not been created yet!

apple arbor 4

Time passes and the trees grow. The curved metal arches are temporary “training” fixtures I used to wrap graft the trees into the arch.  The black metal arbor is at the entrance from the backyard.  It needs to be leveled and then we have flag stones to lay for a floor. We will lay clear plexi across the center top over where a table and chairs will be placed. There will be an old wood stove off to the left for evening fires.  There are grapes planted on the left columns . In the distance one of several sculpture by Alex Kovacs, an artist we admire for modern work.

As you can see from the lead picture, I have pruning to do. Need to get out and get it done soon.  Will try to accomplish it myself. If I am not successful I will call in our area apple expert  Todd Parlo, who developed, owns and runs Walden Heights Nursery & Orchard

3

Planning a Melon House this Season – Growing Melons in Vermont..

Time to tackle a new gardening endeavor. Planning to take one of the hoop houses and devote it to growing melons. Have never grown melons before and know that here in Vermont they will need extra heat and protection from Vermont weather.

Has anyone reading this entry successfully grown melons in a northern climate? I would appreciate hearing about your success or lack of success!

This year we are ordering from three organic seed companies.  The melon seeds are coming from Baker Creek Heirloom Seeds. We selected four varieties for our first attempt at melon production, all from Baker Creek Heirloom Seeds.

Charentais Melon

1) Charentais Melon: A famous French heirloom with a light grey-green skin. The bright orange flesh is super sweet and very fragrant, with melons weighing 2-3 lbs. 

Noir des Carmes

2) Noir de Carmes Melon: A beautiful and rare heirloom from France. The “Black Rock” melon preserved by the Carmelite monks. It was mentioned by Mawe & Abercrombie in 1787. Nearly black in color, the fruit turns orange as it ripens. They are deeply ribbed and have smooth skin. The flesh is orange in color, thick, flavorful and perfumed, with melons weighing 3-6lbs.

Petit Gris De Rennes Melon2

3) Petit Gris De Rennes Melon: A dense 2 lb. melon with orange flesh that is superbly sweet, flavorful and perfumed. This variety is early and well adapted to cool climates. This melon weighs around 2 lbs. and has a grey-green rind. This fine French variety is of the best quality and is the favorite melon of the French melon expert and author Bruno Defay. Rare in the USA.

Thai Golden Round Melon

4) Thai Golden Round Melon: This is a new offering in the States. The plants are extremely productive, The big 6-lb melons look like glowing orange pumpkins. The green flesh is sweet and melting, and has a very unique tropical taste, somewhat un-melonlike in flavor.

There are hundreds of melon offerings! It was hard to pick just four! I went with visual appeal, then description. If successful and we like them we will stick with this combination. Otherwise we will try others as we are determined to grow melons here in Vermont.

At the beginning I mentioned that we used three organic seed sources this year. The other two are High Mowing Seeds, not too far from us in Hardwick, Vermont, and Valentine & Sons Seed Company, LLC in neighboring New Hampshire.

Finding good organic seed sources is getting more and more difficult with Monsanto trying to take over the world with their GMOs. Later I will do an entry with a longer list of safe seed sources. For now, know you are good with these three.

2013 will see melons growing at Fayrehale, fertilized with composted Chantecler manure.

My mouth is watering already!!

1

Greetings from Fayrehale and from Vermont!

For years I have been talking about blogging to share our experiences living in an increasingly difficult world. Others who know me have constantly encouraged me to start as they feel that others can and will benefit from what we are doing..

Simply put, we are working to be as self sufficient as possible. Working to build a local community of resources for the things we can not do ourselves.

We are raising fruit (apples, pears, plums, cherries, raspberries, blueberries, rhubarb, gooseberries, currants and strawberries), vegetables, chickens for meat, eggs and a small income and rabbits for meat. All on .6 acres (notice the point) on the edge of a small picturesque Vermont village.

We are no different than the thousands and thousands of others doing the same thing.  It is my sincere hope that this site can be a hub for a large network of like minded people.  For now we will leave all pages open for comments so that discussions and ideas can be shared.  Some of you have vast experience and others are just starting. We value both ends of the spectrum equally and together we can grow and make a difference.

We will be expanding this site and have made sure that there is something on each page as we launch.  Hopefully these snippets will give you a little insight into us and our life. Hopefully they will entice you to keep coming back and participating as we grow.

It is exciting to finally do it and not just talk about it!  It is also daunting as now there is a responsibility to keep going.

I have some catching up to do on the various pages to bring you to where we are today..  I will work to connect at least weekly as we progress into a new year and growing season.  The poultry are displaying and I am anxious to start hatching and to start seeds for the garden.

One final note!  I write informally as if I am talking! Lots of dashes, dots and phrases!  Thomas Jefferson did it in his personal correspondence so I figure I am in good company.  Jefferson also lived a life that I feel meets my definition of “Elegant Simplicity”.  One keeps their hands in the earth, their connection and interaction with nature while enjoying a nice table, friends, books, music and art.

Come along with us as we make this journey.

4

Powered by WordPress. Designed by WooThemes